Web 下一代免密登录技术 Passkeys 介绍
用户登录一般都是使用账号密码登录,但是使用密码登录有一些问题一直无法解决,比如安全问题和不同设备密码同步以及需要借助密码管理器帮助管理不同密码。于是目前业界提出了 Passkeys 的标准,可以利用设备生物认证方便的注册和重复登录,不需要单纯依靠记忆力或者密码管理器管理不同密码,支持在不同设备间同步,并且得到了 Apple、Google、Microsoft 等大厂的支持.
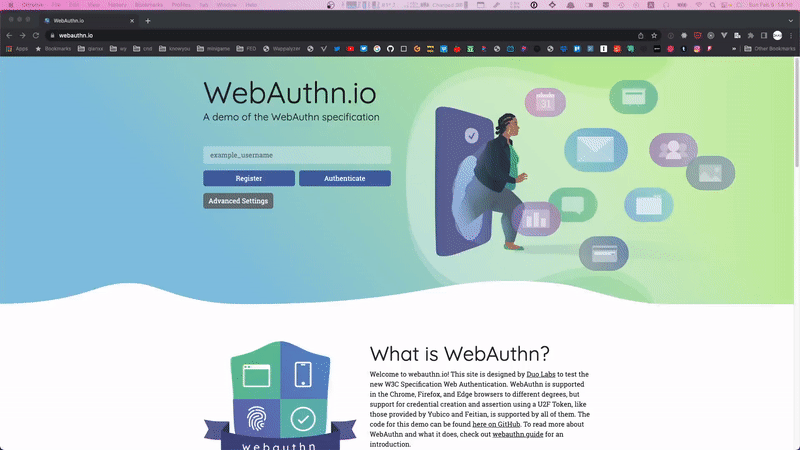
示例
以下示例使用 https://webauthn.io/ (opens in a new tab)
注册时生成 Passkeys

使用 Passkeys 登录
Web 页面中如何实现
创建
参考 web.dev 上的文档 Create a passkey for passwordless logins (opens in a new tab)
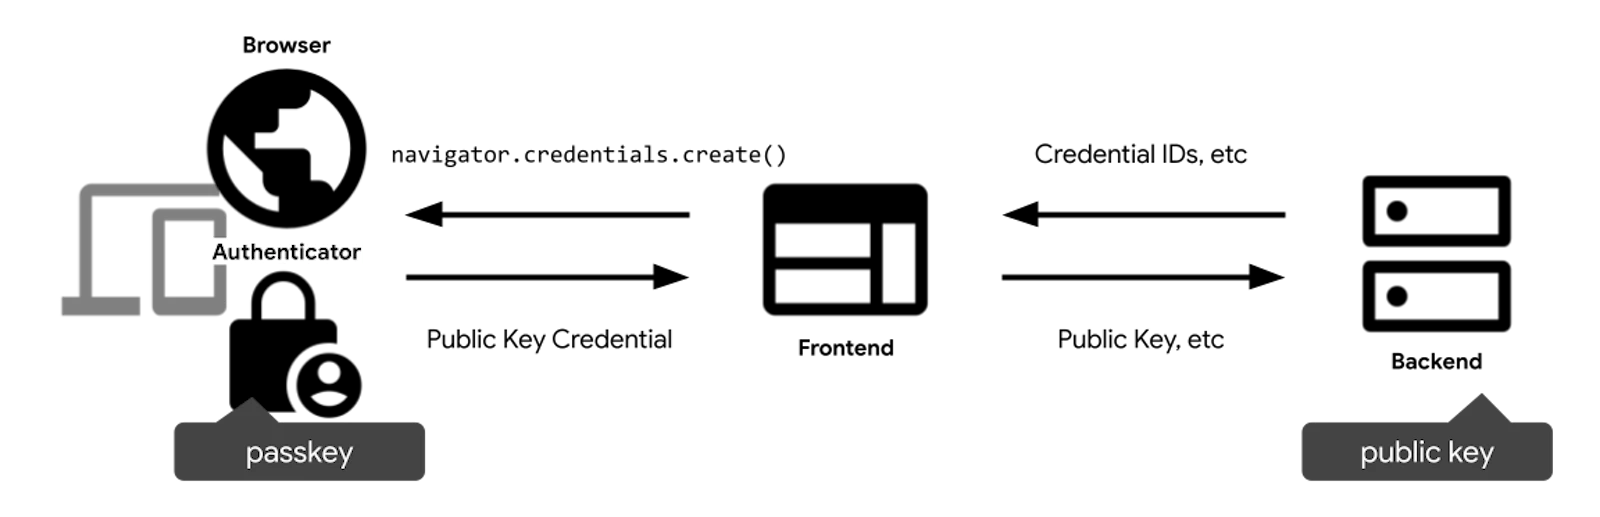
为用户创建 Passkey 的流程大致如下:
- 判断当前设备是否支持
- 用户点击创建
Passkey按钮,调用navigator.credentials.create()API - 调用
navigator.credentials.create()API之后会调用用户设备的生物识别,如果成功会返回公钥 - 将返回的公钥和用户信息传给后端进行存储
对应的示例代码如下:
判断当前设备是否支持
// Availability of `window.PublicKeyCredential` means WebAuthn is usable.
// `isUserVerifyingPlatformAuthenticatorAvailable` means the feature detection is usable.
// `isConditionalMediationAvailable` means the feature detection is usable.
if (window.PublicKeyCredential &&
PublicKeyCredential.isUserVerifyingPlatformAuthenticatorAvailable &&
PublicKeyCredential.isConditionalMediationAvailable) {
// Check if user verifying platform authenticator is available.
Promise.all([
PublicKeyCredential.isUserVerifyingPlatformAuthenticatorAvailable(),
PublicKeyCredential.isConditionalMediationAvailable(),
]).then(results => {
if (results.every(r => r === true)) {
// Display "Create a new passkey" button
}
});
} 用户点击创建 Passkey 按钮,调用 navigator.credentials.create() API
const publicKeyCredentialCreationOptions = {
  challenge: *****,
  rp: {
    name: "Example",
    id: "example.com",
  },
  user: {
    id: *****,
    name: "john78",
    displayName: "John",
  },
  pubKeyCredParams: [{alg: -7, type: "public-key"},{alg: -257, type: "public-key"}],
  excludeCredentials: [{
    id: *****,
    type: 'public-key',
    transports: ['internal'],
  }],
  authenticatorSelection: {
    authenticatorAttachment: "platform",
    requireResidentKey: true,
  }
};

const credential = await navigator.credentials.create({
  publicKey: publicKeyCredentialCreationOptions
});

// Encode and send the credential to the server for verification.
将返回的公钥和用户信息传给后端进行存储。
登录
参考 web.dev 上的文档 Sign in with a passkey through form autofill (opens in a new tab)
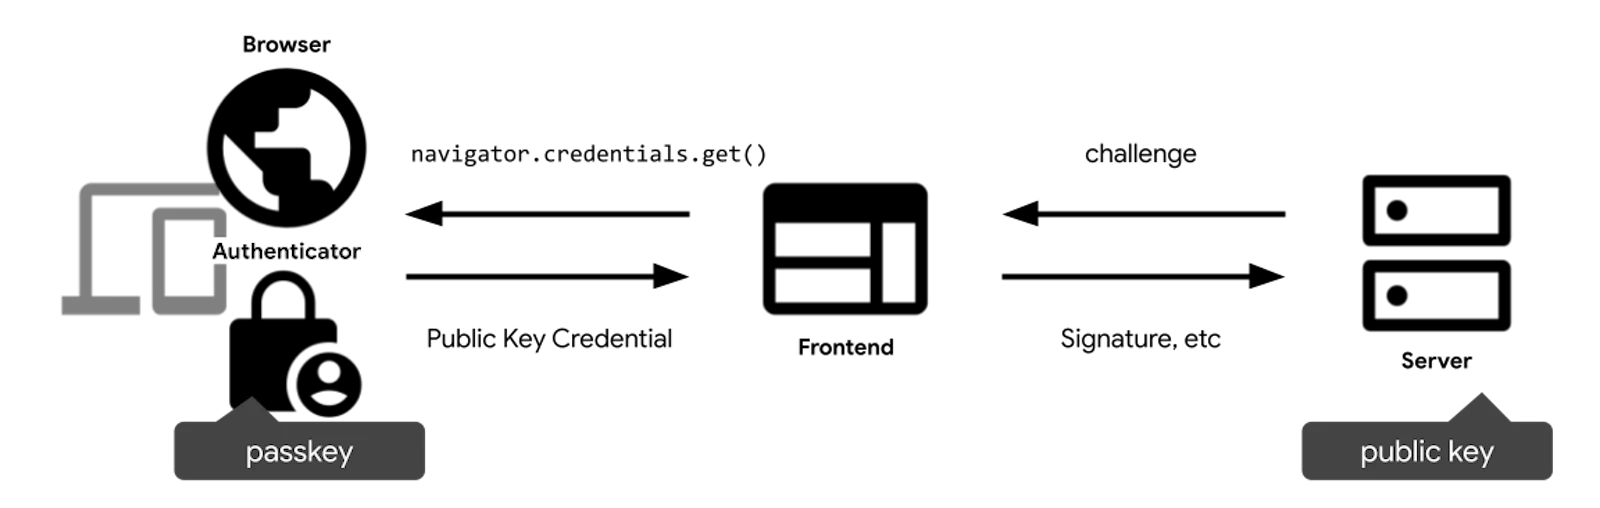
用户使用已有 Passkey 登录的流程大致如下:
- 调用
navigator.credentials.get()API 获取对应用户的Passkey - 用户设备的生物识别成功后会返回对应的公钥
- 将返回的公钥传给后端验证
示例代码如下:
输入框中的 autocomplete 属性中加入 webauth 可以方便用户选择已有的 Passkey
<input type="text" name="username" autocomplete="username webauthn" ...>调用 navigator.credentials.get() API 获取对应用户的 Passkey
// To abort a WebAuthn call, instantiate an `AbortController`.
const abortController = new AbortController();

const publicKeyCredentialRequestOptions = {
  // Server generated challenge
  challenge: ****,
  // The same RP ID as used during registration
  rpId: 'example.com',
};

const credential = await navigator.credentials.get({
  publicKey: publicKeyCredentialRequestOptions,
  signal: abortController.signal,
  // Specify 'conditional' to activate conditional UI
  mediation: 'conditional'
});
将返回的公钥传给后端验证,这一步在后端服务中处理。校验成功后,用户即可登录成功。
借助 SimpleWebAuthn 或者 Hanko 第三方库方便快速的实现
由于使用 Passkeys 涉及 API 较多,同时涉及前后端,我们可以使用社区封装的 SimpleWebAuthn 或者 Hanko 来简化接入的过程。他们的示例代码可以在以下链接找到:
以 SimpleWebAuthn 为例,我们前端主要关注的是页面上的接入,即调用 startRegistration 注册用户及生成 Passkeys, 调用 startAuthentication 为已有用户登录
- 引入前端页面依赖
@simplewebauthn/browser
import SimpleWebAuthnBrowser from '@simplewebauthn/browser';- 调用
startRegistration注册用户及生成Passkeys
  const { startRegistration } = SimpleWebAuthnBrowser;

  // <button>
  const elemBegin = document.getElementById('btnBegin');
  // <span>/<p>/etc...
  const elemSuccess = document.getElementById('success');
  // <span>/<p>/etc...
  const elemError = document.getElementById('error');

  // Start registration when the user clicks a button
  elemBegin.addEventListener('click', async () => {
    // Reset success/error messages
    elemSuccess.innerHTML = '';
    elemError.innerHTML = '';

    // GET registration options from the endpoint that calls
    // @simplewebauthn/server -> generateRegistrationOptions()
    const resp = await fetch('/generate-registration-options');

    let attResp;
    try {
      // Pass the options to the authenticator and wait for a response
      attResp = await startRegistration(await resp.json());
    } catch (error) {
      // Some basic error handling
      if (error.name === 'InvalidStateError') {
        elemError.innerText = 'Error: Authenticator was probably already registered by user';
      } else {
        elemError.innerText = error;
      }

      throw error;
    }

    // POST the response to the endpoint that calls
    // @simplewebauthn/server -> verifyRegistrationResponse()
    const verificationResp = await fetch('/verify-registration', {
      method: 'POST',
      headers: {
        'Content-Type': 'application/json',
      },
      body: JSON.stringify(attResp),
    });

    // Wait for the results of verification
    const verificationJSON = await verificationResp.json();

    // Show UI appropriate for the `verified` status
    if (verificationJSON && verificationJSON.verified) {
      elemSuccess.innerHTML = 'Success!';
    } else {
      elemError.innerHTML = `Oh no, something went wrong! Response: <pre>${JSON.stringify(
        verificationJSON,
      )}</pre>`;
    }
});- 调用
startAuthentication为已有用户登录
  const { startAuthentication } = SimpleWebAuthnBrowser;

  // <button>
  const elemBegin = document.getElementById('btnBegin');
  // <span>/<p>/etc...
  const elemSuccess = document.getElementById('success');
  // <span>/<p>/etc...
  const elemError = document.getElementById('error');

  // Start authentication when the user clicks a button
  elemBegin.addEventListener('click', async () => {
    // Reset success/error messages
    elemSuccess.innerHTML = '';
    elemError.innerHTML = '';

    // GET authentication options from the endpoint that calls
    // @simplewebauthn/server -> generateAuthenticationOptions()
    const resp = await fetch('/generate-authentication-options');

    let asseResp;
    try {
      // Pass the options to the authenticator and wait for a response
      asseResp = await startAuthentication(await resp.json());
    } catch (error) {
      // Some basic error handling
      elemError.innerText = error;
      throw error;
    }

    // POST the response to the endpoint that calls
    // @simplewebauthn/server -> verifyAuthenticationResponse()
    const verificationResp = await fetch('/verify-authentication', {
      method: 'POST',
      headers: {
        'Content-Type': 'application/json',
      },
      body: JSON.stringify(asseResp),
    });

    // Wait for the results of verification
    const verificationJSON = await verificationResp.json();

    // Show UI appropriate for the `verified` status
    if (verificationJSON && verificationJSON.verified) {
      elemSuccess.innerHTML = 'Success!';
    } else {
      elemError.innerHTML = `Oh no, something went wrong! Response: <pre>${JSON.stringify(
        verificationJSON,
      )}</pre>`;
    }
  });
可以看到借助第三方依赖封装之后接入会更加简单,需要使用的 API 也更少更直观。其他更多 API 可以参考 SimpleWebAuthn 文档 (opens in a new tab)
!!!注意:目前 Passkeys 功能还非完善阶段,如果需要使用请注意设备支持,可以参考 Device Support (opens in a new tab)
参考链接
- passkeys.dev (opens in a new tab)
- WebAuthn.io A demo of the WebAuthn specification (opens in a new tab)
- SimpleWebAuthn (opens in a new tab)
- Passkeys.io Demo (opens in a new tab)
- Hanko (opens in a new tab)
- Google 文档 Passwordless login with passkeys (opens in a new tab)
- Introducing passkeys in Chrome (opens in a new tab)
- Create a passkey for passwordless logins (opens in a new tab)
- Sign in with a passkey through form autofill (opens in a new tab)
- Apple Passkeys 文档 (opens in a new tab)
- Apple WWDC Video: Move beyond passwords (opens in a new tab)
- webauthn.io 源码 (opens in a new tab)