Docker Init: 自动生成Dockerfile、docker-compose.yaml和.dockerignore 文件
很多框架都带有脚手架工具,帮助初始化项目,可以快速开始开发。Docker 在最近的更新上也引入了 docker init 命令,帮忙生成 Dockerfile、.dockerignore、docker-compose.yaml,帮助项目快速接入 Docker. 本文简单探索这个工具的使用。
安装
只需要将 Docker Desktop 升级到 4.19.0 之后既可以使用 docker init 命令。
使用
在一个项目中使用 docker init 命令即可,docker 会自动检测项目语言,目前支持的语言有 Go, Python, Node。
这里我们用一个 Vite 示例项目 (opens in a new tab)
docker init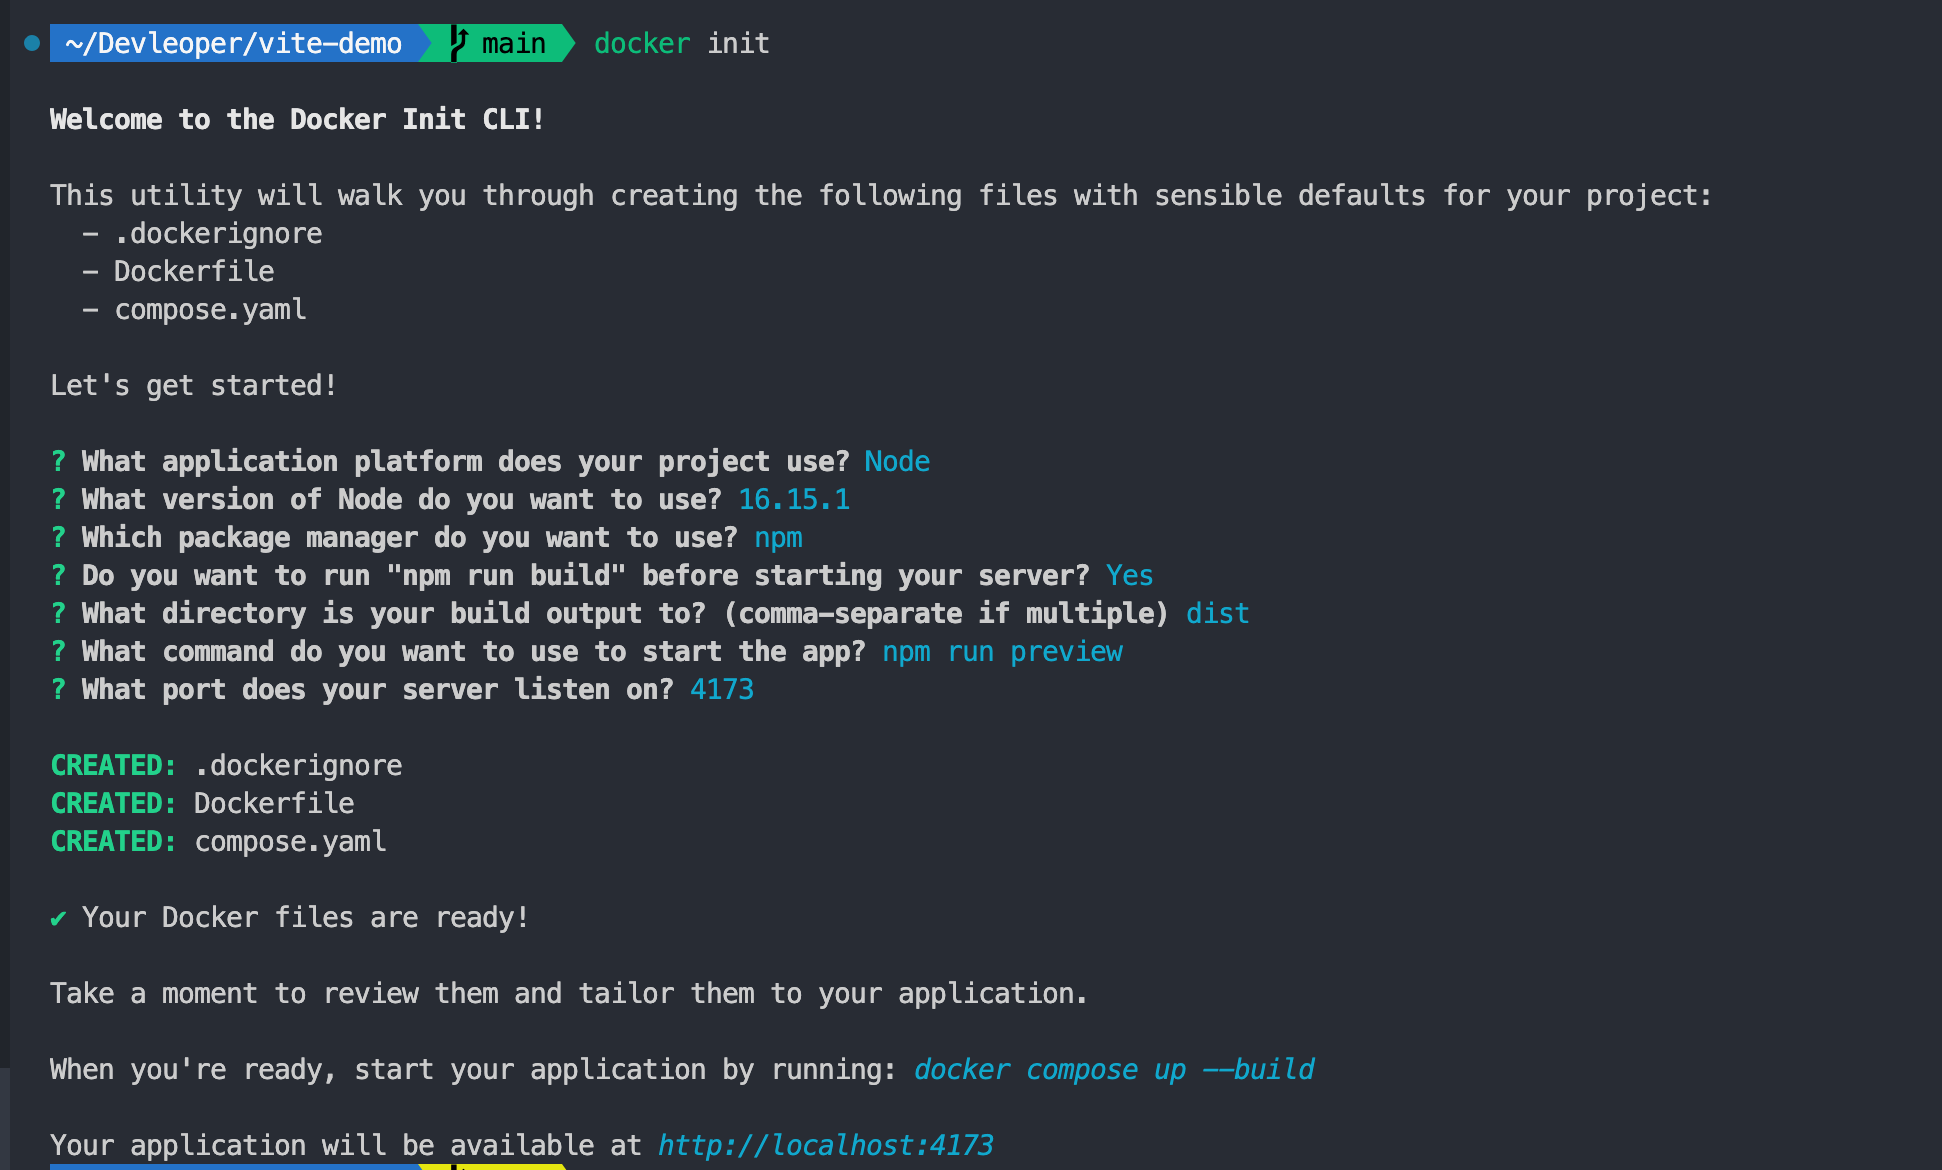
可以看到经过一些指使和确定项目启动命令之后,成功生成了 Dockerfile、.dockerignore、compose.yaml 三个文件。并且提示我们使用 docker compose up --build 即可使用 docker 启动。
生成的文件
生成的文件还是比较简单和模版类似的,但是基本符合使用需求,如果有需要可以自己在此基础上修改。我们这里就把 npm ci --omit=dev 这行安装命令改成 npm ci 以免后续启动报错(这里只是示例启动,实际项目部署应该按照自己项目需求和部署方式)。
Dockerfile
# syntax=docker/dockerfile:1

# Comments are provided throughout this file to help you get started.
# If you need more help, visit the Dockerfile reference guide at
# https://docs.docker.com/engine/reference/builder/

ARG NODE_VERSION=16.15.1

################################################################################
# Use node image for base image for all stages.
FROM node:${NODE_VERSION}-alpine as base

# Set working directory for all build stages.
WORKDIR /usr/src/app


################################################################################
# Create a stage for installing production dependecies.
FROM base as deps

# Download dependencies as a separate step to take advantage of Docker's caching.
# Leverage a cache mount to /root/.npm to speed up subsequent builds.
# Leverage bind mounts to package.json and package-lock.json to avoid having to copy them
# into this layer.
RUN --mount=type=bind,source=package.json,target=package.json \
    --mount=type=bind,source=package-lock.json,target=package-lock.json \
    --mount=type=cache,target=/root/.npm \
    npm ci

################################################################################
# Create a stage for building the application.
FROM deps as build

# Download additional development dependencies before building, as some projects require
# "devDependencies" to be installed to build. If you don't need this, remove this step.
RUN --mount=type=bind,source=package.json,target=package.json \
    --mount=type=bind,source=package-lock.json,target=package-lock.json \
    --mount=type=cache,target=/root/.npm \
    npm ci --omit=dev

# Copy the rest of the source files into the image.
COPY . .
# Run the build script.
RUN npm run build

################################################################################
# Create a new stage to run the application with minimal runtime dependencies
# where the necessary files are copied from the build stage.
FROM base as final

# Use production node environment by default.
ENV NODE_ENV production

# Run the application as a non-root user.
USER node

# Copy package.json so that package manager commands can be used.
COPY package.json .

# Copy the production dependencies from the deps stage and also
# the built application from the build stage into the image.
COPY --from=deps /usr/src/app/node_modules ./node_modules
COPY --from=build /usr/src/app/dist ./dist


# Expose the port that the application listens on.
EXPOSE 4173

# Run the application.
CMD npm run preview
.dockerignore
# Include any files or directories that you don't want to be copied to your
# container here (e.g., local build artifacts, temporary files, etc.).
#
# For more help, visit the .dockerignore file reference guide at
# https://docs.docker.com/engine/reference/builder/#dockerignore-file

**/.classpath
**/.dockerignore
**/.env
**/.git
**/.gitignore
**/.project
**/.settings
**/.toolstarget
**/.vs
**/.vscode
**/.next
**/.cache
**/*.*proj.user
**/*.dbmdl
**/*.jfm
**/charts
**/docker-compose*
**/compose*
**/Dockerfile*
**/node_modules
**/npm-debug.log
**/obj
**/secrets.dev.yaml
**/values.dev.yaml
**/build
**/dist
LICENSE
README.md
compose.yaml
# Comments are provided throughout this file to help you get started.
# If you need more help, visit the Docker compose reference guide at
# https://docs.docker.com/compose/compose-file/

# Here the instructions define your application as a service called "server".
# This service is built from the Dockerfile in the current directory.
# You can add other services your application may depend on here, such as a
# database or a cache. For examples, see the Awesome Compose repository:
# https://github.com/docker/awesome-compose
services:
  server:
    build:
      context: .
    environment:
      NODE_ENV: production
    ports:
      - 4173:4173

# The commented out section below is an example of how to define a PostgreSQL
# database that your application can use. `depends_on` tells Docker Compose to
# start the database before your application. The `db-data` volume persists the
# database data between container restarts. The `db-password` secret is used
# to set the database password. You must create `db/password.txt` and add
# a password of your choosing to it before running `docker-compose up`.
#     depends_on:
#       db:
#         condition: service_healthy
#   db:
#     image: postgres
#     restart: always
#     user: postgres
#     secrets:
#       - db-password
#     volumes:
#       - db-data:/var/lib/postgresql/data
#     environment:
#       - POSTGRES_DB=example
#       - POSTGRES_PASSWORD_FILE=/run/secrets/db-password
#     expose:
#       - 5432
#     healthcheck:
#       test: [ "CMD", "pg_isready" ]
#       interval: 10s
#       timeout: 5s
#       retries: 5
# volumes:
#   db-data:
# secrets:
#   db-password:
#     file: db/password.txt
接着使用 docker compose up --build 即可通过 docker 启动项目
参考链接
- Docker Blog (opens in a new tab)
- Docker Docs (opens in a new tab)
- 视频介绍:docker init 命令初体验 | 自动生成Dockerfile、docker-compose.yaml和.dockerignore 文件? (opens in a new tab)
- Vite 示例项目 (opens in a new tab)